高阶19 在AWS上安装运行Alphafold v2进行蛋白质结构预测
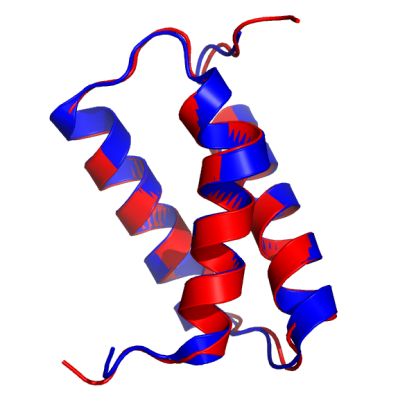
最近AI界平地一声雷,DEEPMIND的Alphafold v2版本横空出世,最好的预测精度号称能达到结构生物学实验的测量精度,要知道这玩意儿可是上千万美金的冷冻电镜才能做出来的,一时间舆论大起,有认为划时代的,有认为没啥用的,唇枪舌剑不可开交。愚以为,有,总比没有好! -- D.C
本文转自AWS官方博客在AWS上使用AlphaFold进行蛋白质结构预测,由于存在不可描述的原因,这个地址经常打不开,所以我就搬过来了。
AlphaFold
AlphaFold是DEEPMIND开发的一个能根据蛋白质序列预测构象的深度学习模型,和两年前的一代目相比,AlphaFold2的主要变化是直接训练蛋白质结构的原子坐标,而不是用以往常用的、简化了的原子间距或者接触图。这也使得AlphaFold2在解析蛋白结构的速度上有了进一步的提高。
而在传统上,蛋白质结构预测可以分为基于模板和从头预测,但是AlphaFold2只用同一种方法—就是机器学习,对几乎所有的蛋白质都预测出了正确的拓扑学的结构,其中有大约2/3的蛋白质预测精度达到了结构生物学实验的测量精度。
2021年7月,DeepMind开源了升级版本AlphaFold v2.0,本文简要描述了如何在AWS上使用AlphaFold进行蛋白质结构预测。
本着是骡子是马,总要自己骑了才知道的朴素科学观,利用aws云端资源,可以快速构建出AlphaFold2的pipeline。
EC2实例设置
-
运行AlphaFold需要安装Docker和NVIDIA Container Toolkit,我们可以启动一台运行ECS GPU-optimized AMI的EC2实例,以省去这些工具的安装操作:
-
启动EC2实例,搜索AMI: amzn2-ami-ecs-gpu-hvm-2.0.2021,选择最新的日期的版本(也可以从这里 查询对于区域的最新Amazon Linux(GPU)AMI ID)
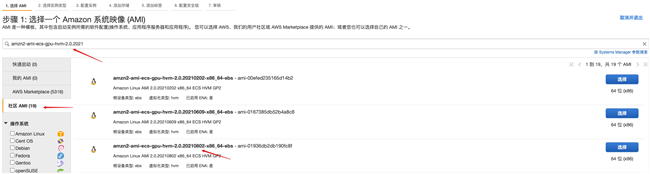
- 如果要使用NVIDIA A100则实例类型可选择p4d.24xlarge,本例测试选择具有4块NVIDIA V100 GPU的p3.8xlarge。

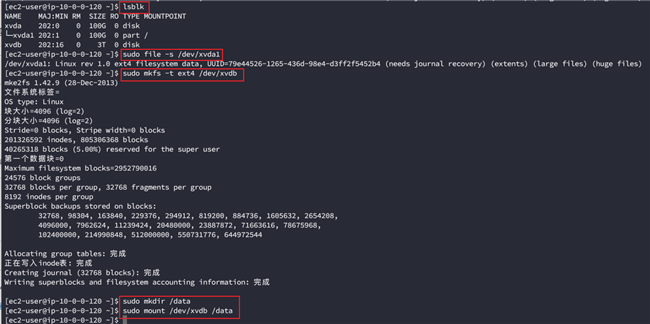
- 系统卷100G,增加一个3T的数据卷,卷类型均为gp3

- 实例创建完成后登录系统,格式化并挂载3T的数据盘到/data,具体操作参考这个帖子:如何让 EC2 “妻妾成群”?挂载更多磁盘并实现自动挂载!
数据库下载
- 安装依赖
sudo rpm http://dl.fedoraproject.org/pub/epel/epel-release-latest-7.noarch.rpm
sudo yum install aria2 rsync git vim wget -y
- 修改/data目录权限
sudo chown ec2-user:ec2-user -R /data
- 克隆AlphaFold 代码库并进入alphafold目录 github 地址
git clone https://github.com/deepmind/alphafold.git
- 下载数据到/data,因为数据下载加解压可能需要十几个小时的时间,所以使用nohup让下载任务在后台执行
nohup scripts/download_all_data.sh /data &
完成之后在下载目录会有如下文件生成:
$DOWNLOAD_DIR/                          # Total: ~ 2.2 TB (download: 438 GB)
    bfd/                                   # ~ 1.7 TB (download: 271.6 GB)
        # 6 files.
    mgnify/                                # ~ 64 GB (download: 32.9 GB)
        mgy_clusters_2018_12.fa
    params/                                # ~ 3.5 GB (download: 3.5 GB)
        # 5 CASP14 models,
        # 5 pTM models,
        # LICENSE,
        # = 11 files.
    pdb70/                                 # ~ 56 GB (download: 19.5 GB)
        # 9 files.
    pdb_mmcif/                             # ~ 206 GB (download: 46 GB)
        mmcif_files/
            # About 180,000 .cif files.
        obsolete.dat
    small_fbd/                             # ~ 17 GB (download: 9.6 GB)
        bfd-first_non_consensus_sequences.fasta
    uniclust30/                            # ~ 86 GB (download: 24.9 GB)
        uniclust30_2018_08/
            # 13 files.
    uniref90/                              # ~ 58 GB (download: 29.7 GB)
        uniref90.fasta
运行AlphaFold
- 创建输出目录
mkdir -p /tmp/alphafold
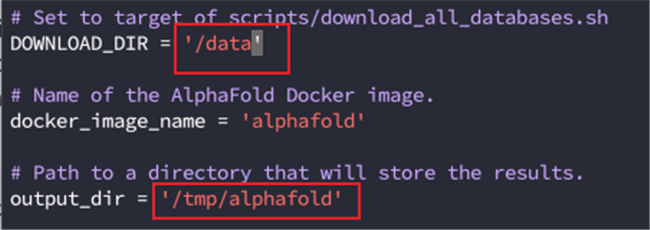
- 将docker/run_docker.py中的DOWNLOAD_DIR修改为包含下载数据库目录的路径/data, output_dir设置为上一步创建的输出目录
- 构建Docker镜像
docker build -f docker/Dockerfile -t alphafold .
完成后查看:

- 安装依赖
pip3 install -r docker/requirements.txt
- 测试文件
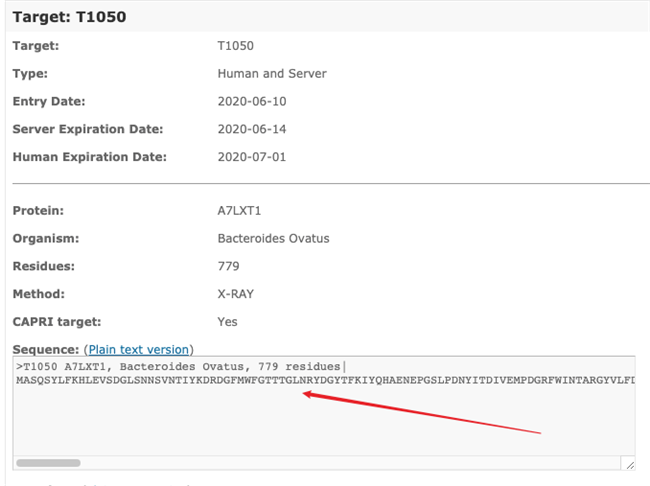
打开这个网址,复制Sequence的文本到T1050.fasta文件中

- 运行可能需要几个小时时间,可以同样使用nohup命令让任务在后台执行
nohup python3 docker/run_docker.py --fasta_paths=T1050.fasta --max_template_date=2020-05-14 &
一个任务只能使用一块GPU,如果计算实例具有多块GPU,可以利用–gpu_devices参数将多个任务投递到不同的GPU上进行计算,如:
nohup python3 docker/run_docker.py --fasta_paths=T1050-1.fasta --max_template_date=2020-05-14 --gpu_devices=0 &

nohup python3 docker/run_docker.py --fasta_paths=T1050-2.fasta --max_template_date=2020-05-14 --gpu_devices=1 &
- 完成之后在之前设置的/tmp/alphafold目录下会有结果输出:

监控配置
我们可以通过CloudWatch来监控CPU、内存和GPU的使用率,其中CPU监控指标CloudWatch默认就支持,内存监控指标需要通过CloudWatch Agent来实现,GPU监控需要通过一个python程序来实现。
- IAM角色
新建一个具有ClooudWatchAgentServerPolicy权限的角色,取名CW-Role

将它附加到EC2实例上:

- CloudWatch Agent

1.安装
sudo yum install collectd amazon-cloudwatch-agent -y
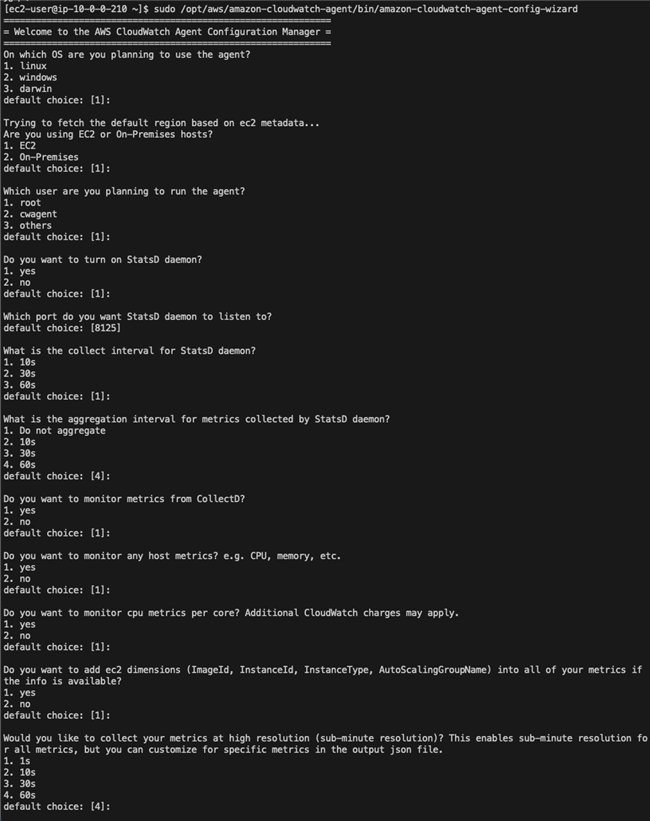
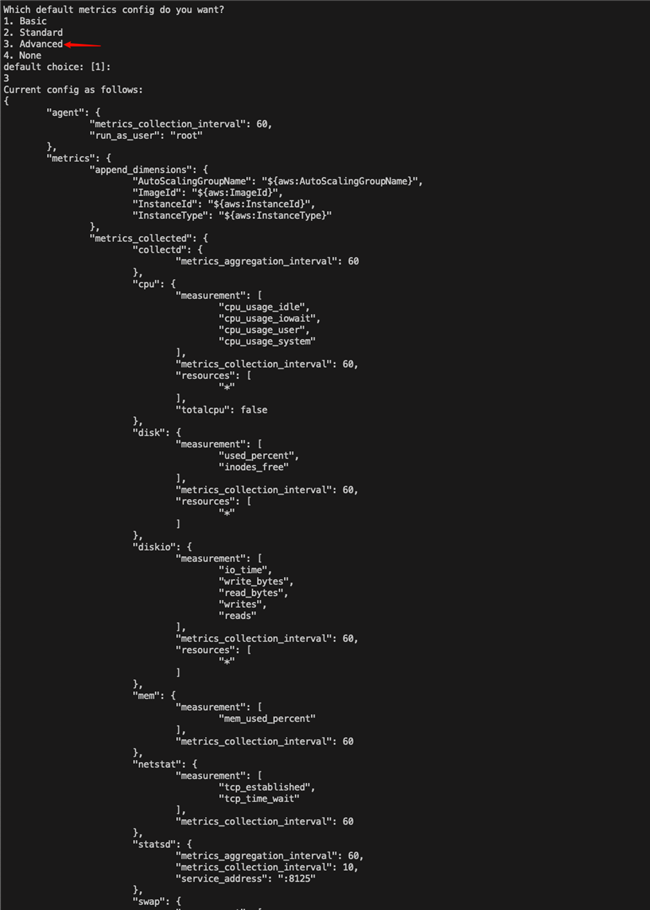
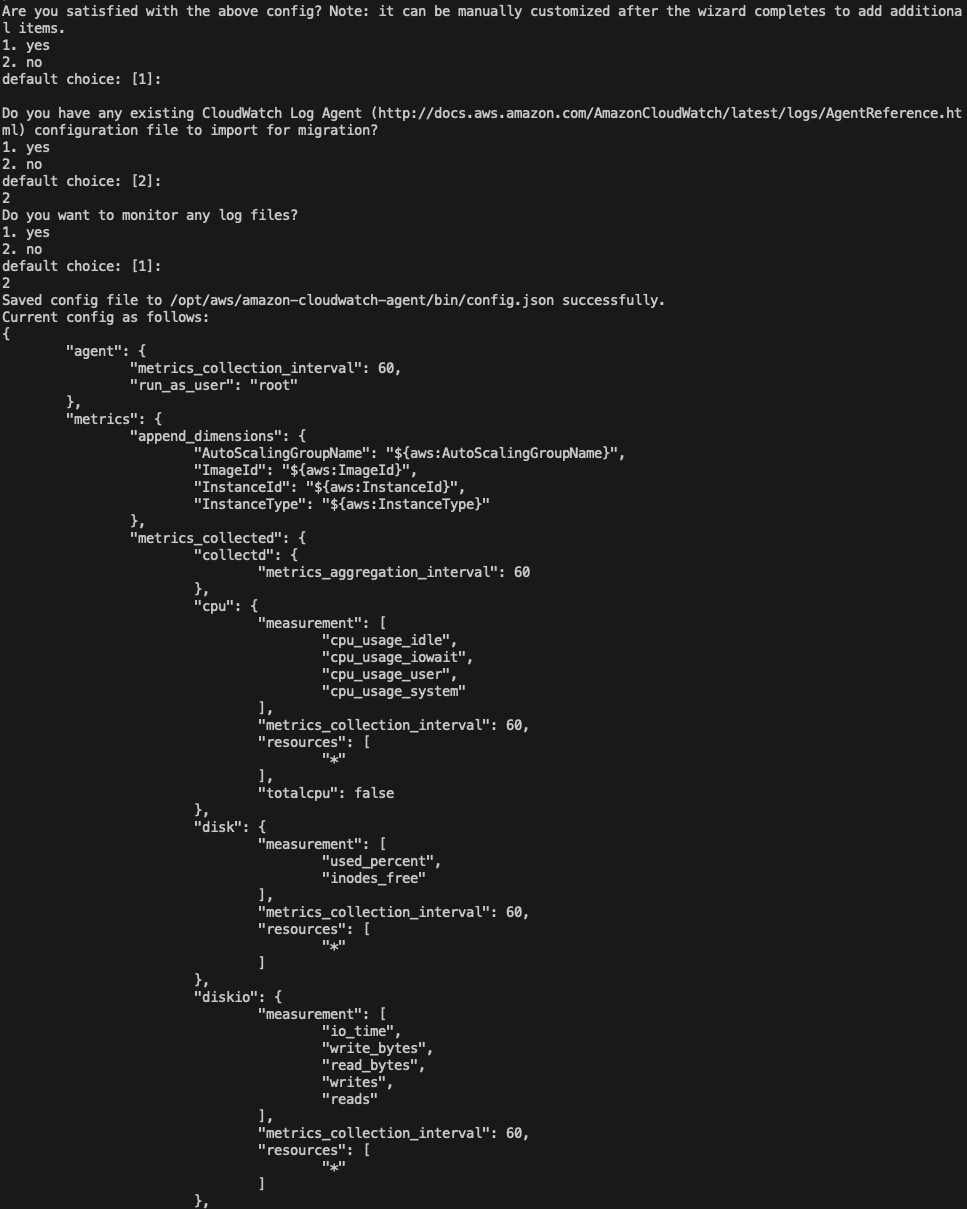
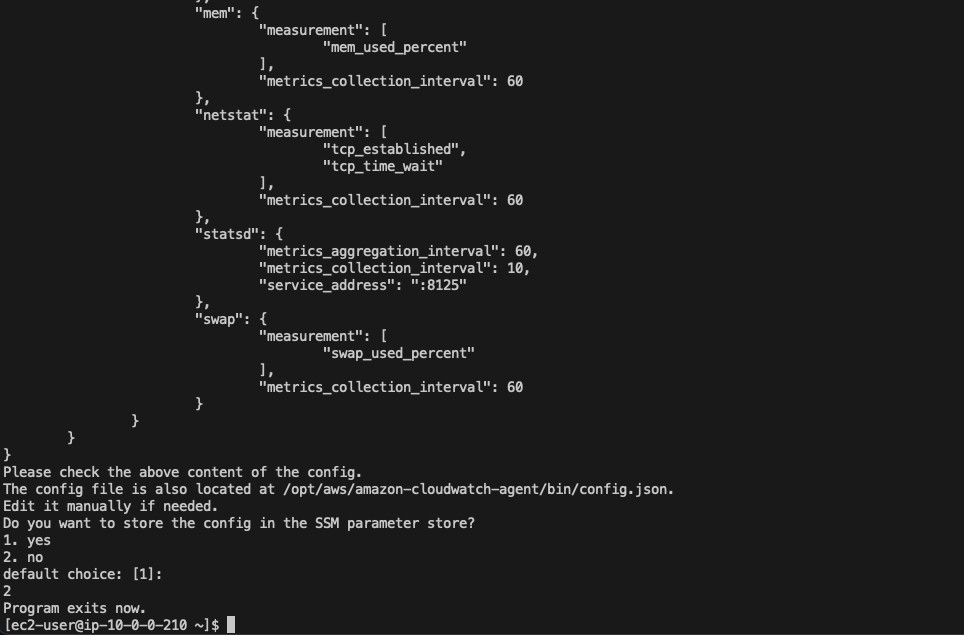
2.执行如下命令并按提示进行配置,详见附录
sudo /opt/aws/amazon-cloudwatch-agent/bin/amazon-cloudwatch-agent-config-wizard
3.重新启动agent
sudo /opt/aws/amazon-cloudwatch-agent/bin/amazon-cloudwatch-agent-ctl -a fetch-config -m ec2 -s -c file:/opt/aws/amazon-cloudwatch-agent/bin/config.json
- GPU监控
1.下载python脚本
wget https://s3.amazonaws.com/aws-bigdata-blog/artifacts/GPUMonitoring/gpumon.py
2.vim gpumon.py
修改

### 选择区域 ####

EC2_REGION = 'us-east-1'

#在此处选择命名空间参数,名字可以随意取###

my_NameSpace = 'AlphaFold'

### 选择推送间隔 ####

sleep_interval = 10

### 选择存储精度 (在 1-60 之间) ####

store_reso = 60
3.安装python2的依赖
wget https://bootstrap.pypa.io/pip/2.7/get-pip.py

python get-pip.py

pip install nvidia-ml-py

pip install boto3
4.执行
nohup python gpumon.py &
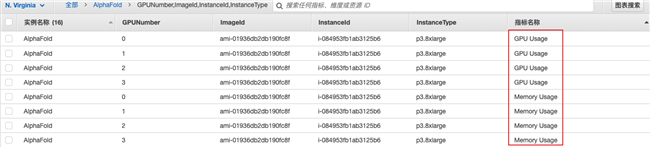
- 查看CloudWatch
在CloudWatch的指标中可以发现CWAgent和AlphaFold两个命名空间,其中包含了我们所需要的内存和GPU监控指标:
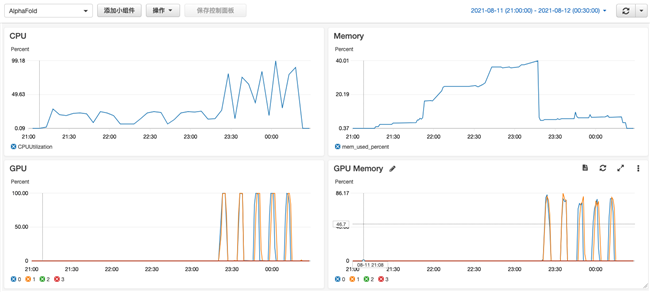
创建一个控制面板来统一监控这些指标:
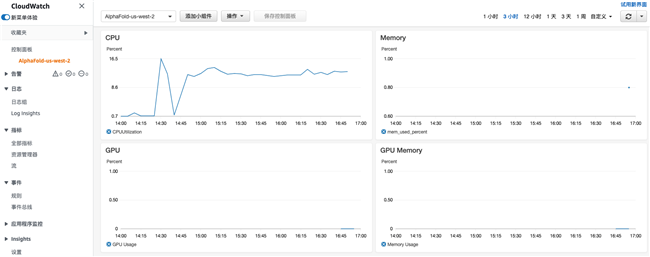
测试结果分析
- 运行命令
python3 docker/run_docker.py --fasta_paths=T1050.fasta --max_template_date=2020-05-14
结果如下:
只有在模型的推理阶段才会用到GPU,而且只用到了4块GPU中的一块,其余阶段都是用的CPU 查看 issue
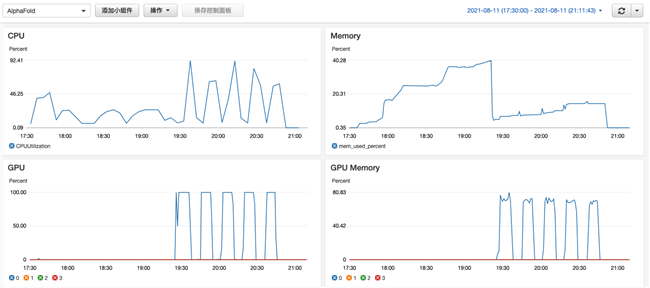
- 投递两个任务
nohup python3 docker/run_docker.py --fasta_paths=T1050-1.fasta --max_template_date=2020-05-14 --gpu_devices=0 > a.out &

nohup python3 docker/run_docker.py --fasta_paths=T1050-2.fasta --max_template_date=2020-05-14 --gpu_devices=1 > b.out &
结果如下:
可以看到用到了2块GPU。
参考
更详细的AlphaFold使用请参考:https://github.com/deepmind/alphafold
一些配置信息
CloudWatch Agent配置示例
社会主流舆论往往是扼杀创新的,如果你有个好点子,你要有被长期误解的心理准备,坚持下去,时间会证明一切。